Category Archives: Yoga Basics

Basic yoga poses.

Half Frog Pose – Ardha Bhekasana

half-frogF
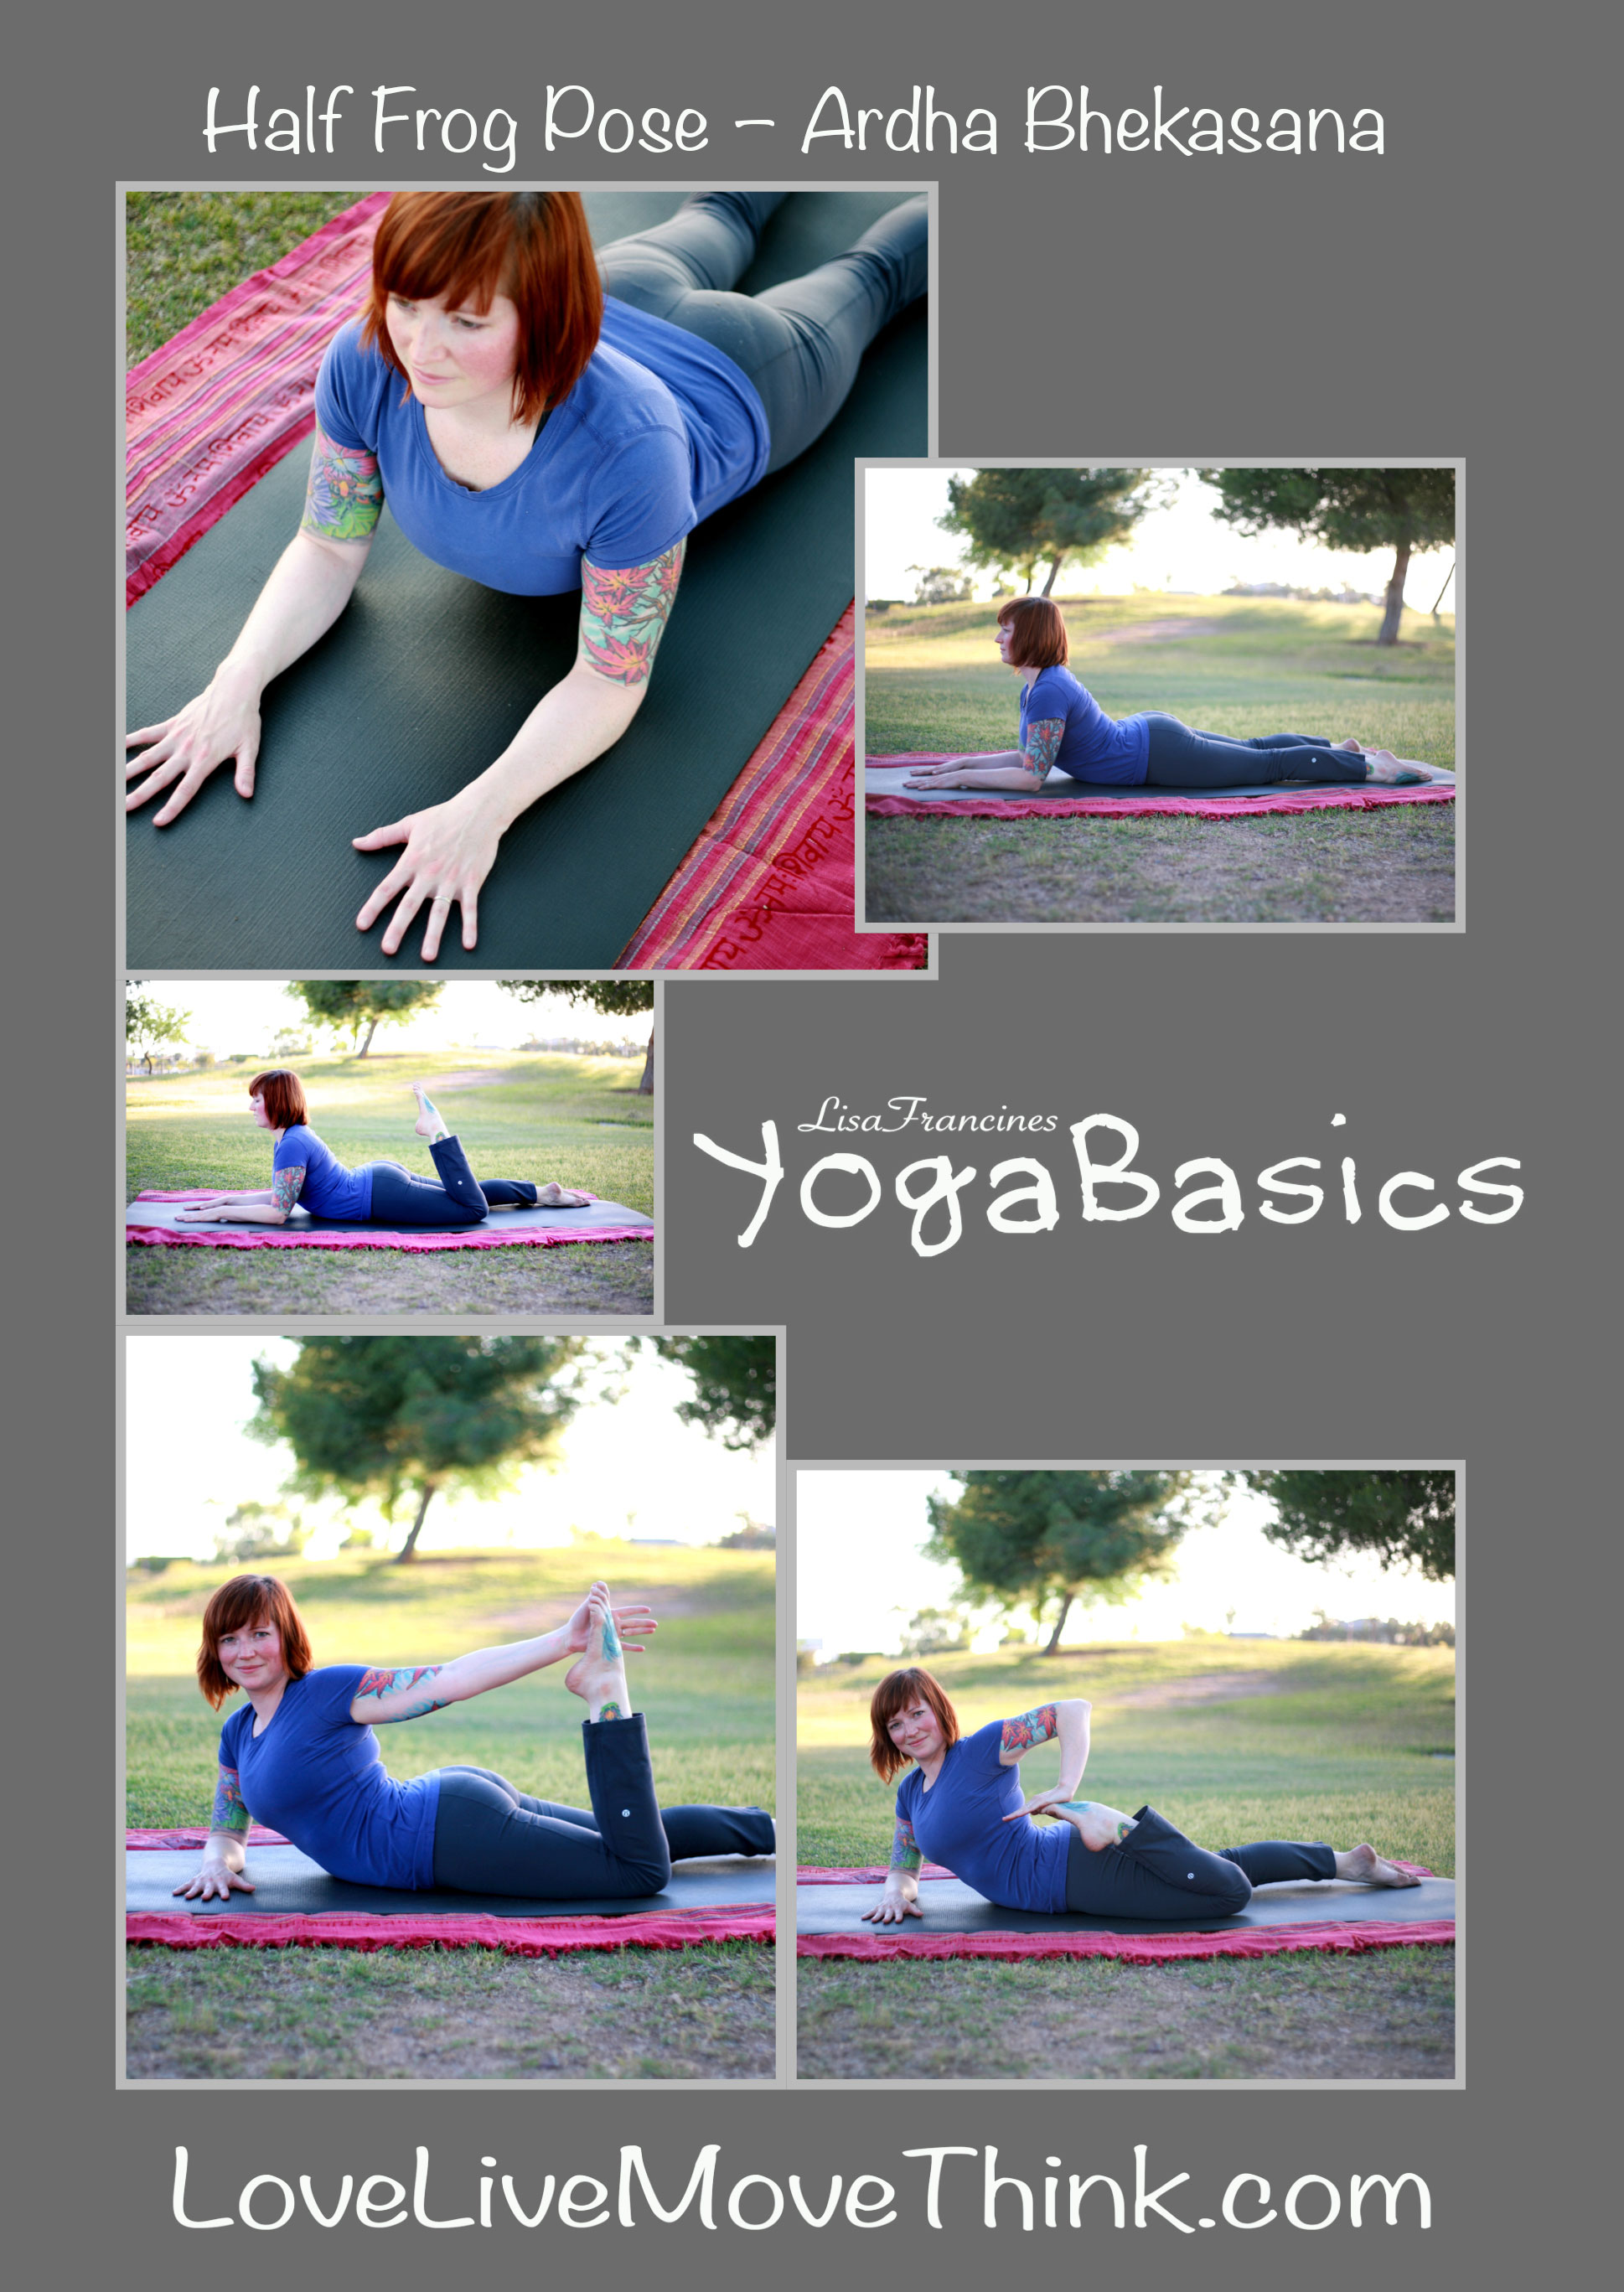
Sphinx Pose (Salamba Bhujangasana) to Half Frog Pose (Ardha Bhekasana).  As you can see in the pictures this is a great opportunity for a chest stretch.  Grab your foot from inside your arch and press your leg away from your body.  This will pull on your arm and create an excellent chest opener.  You’ve got to open up your heart!  Then the next step is to start bending your elbow and bring your foot toward you.  This then becomes a great Quadriceps Stretch.  WAY safer than trying to stand up and do it.

PHOTO BY amyelizabethbruce

Camel Pose – Ustrasana

Camel Pose The photo on the left is how you normally see this pose done. The photo on the right is actually the proper alignment. You will feel the difference when you support your neck and align your palate (the top of your mouth). Hold in your core and tuck your tailbone.  You must engage your muscles don’t just let go in the pose, be strong. If you want neck problems when you’re older go ahead and don’t support your neck. When your neck is happy your lower back will be happy too. You can see my lower back is arching way too much on the left and I’m losing stability in the lumbar area. Over arching your spine is never a good idea!  Only do one arm at a time if using both arms is too intense.

Monkey Lunge – Anjaneyasana

monkeylungeFMonkey lunge is one of my absolute favorite poses. Start in downward facing dog, table top or just lunge. Press into the back heal as you slowly lower the back knee to the ground. If you have any discomfort in your back knee place a blanket or a towel under it. Allow your front knee to slowly move over the ankle toward your toes. This is the only pose you’re allowed to take the knee out of alignment with your ankle. With any other pose you ALWAYS want the knee to be directly over your heal/ankle. STAY HERE! Your now stretching the front of you rear leg (quadriceps muscles) and you’ll probably feel discomfort in the front leg, the inner thigh muscles called adductors. Once you feel comfortable with your balance and control you can try reaching your arms overhead. You’ll feel a stretch in your 3 major core muscles iliopsoas (psoas major/minor & iliacus). These muscles go from the inside of your lumbar vertebrate and pelvis, then all 3 attach to the inside of your upper leg bone, the femur. You’re intestines are their neighbors! When you do core exercise iliopsoas is the prime mover! A mad iliopsoas can create lower back pain that feels as if the pain is wrapping around your waist.  Your palms should be facing. Take your shoulders up into your ears and then roll them down your back. This should create space between your arms and ears. Press though both feet hold in your belly, tuck your tailbone and BREATH! Once this pose gets easier there is so much other fun stuff you can do with it.

(AHN-jah-nay-ah-sa–na) also called crescent lunge pose, low lunge.  PHOTO BY Amyelizabethbruce

Lizard Pose – Sirsangusthasana

lizardFYou can start in downward facing dog, table top or just lunge. Bring the back knee to the grown slowly as you press though your heal. Blanket/towel if you need it under you knee. Then bring both hands to the inside. If you can’t get your elbows down (which is most likely) grab a pillow or a yoga block and place it under your forearms. This pose is a hip opener obviously.  hehe. It really gets the flexer muscles of your hip and the quadriceps (front of the thigh) of your opposite hip. Pressing though my back heal creates stability. You want to hang out in this pose for as much time as you can. Don’t forget to switch sides! Try using downward dog or tabletop as a transition to the other side. Then go back to downward dog after you’re done with your Lizard. Have fun with this one. Also called; head to big toe pose and lizard pose. PHOTO BY amyelizabethbruce

High and Low Plank – Phalakasana

plankFTime to do plank! The key to this pose are the heals, your foundation. Specifically pressing your heal down with all your might. This creates stability. Your hands should be shoulder width apart. Index fingers are parallel, fan out the fingers proportionality creating total symmetry. Squeeze your shoulders up toward your ears then roll your shoulders back down. Tuck your tailbone (aka; squeeze butt cheeks together and push your pubic bone forward). Imagine you have a rope attached to the very crown of your head and someones pulling on it. Your head is extending diagonally and your heals press away from you. You also NEED to contract your abdomen. Activity squeeze the breath out on your exhale. Hold in your belly I still want you to breath with your belly but YOU MUST have conscious control over it’s movement. Hold for as much time as possible. Knees are there when you need a break. Make a goal of holding it for a minute. I know your phone has a stopwatch in it’s clock settings! USE IT!! Time your stretches. {Try going to the forearms for a low plank. Make sure each elbow is placed directly where the hand was. This is much harder. These poses create strength and stability. Try ALSO lifting a leg one at a time, great low back strength exercise.} …AND DON’T FORGET to BREATH of course!!!!

PHOTO BY amyelizabethbruce 

Cat & Cow Pose – Marjarasana

catcowFThis is excellent for getting the body ready to stretch and really energises the spine. Remember stretching your toes? Curl your toes under in tabletop. Knees are under hips and hands under shoulders. Make sure that you look down at your hands and observe that the fingers are spread at an equal distance from one another. Breathing is of course an intrical part of this pose. You can really understand the breath more as you use it to move with these poses. Keep you hands and knees planted firmly on the earth. The only area moving in this pose is your spine and hips! Take a big deep belly breath then on the exhale suck in your belly in. Press your back as high as you can and allow the head to sink toward the ground. You should feel the pelvis and tailbone tuck. Then take your next inhale slowly look up and allow your belly to sink toward the ground. Your butt wants to stick out so let it! Continue to practice controlling the breath with the movement as you go from cat (exhale) to cow (inhale) and on and on. Do it at least 10x. From this pose you can also try and move into your downward dog.

PHOTO by @amyelizabethbruce

Downward Dog Pose – Adho Mukha Svanasana

dwdFPeople always want to hate on this pose but once you get it it’s awesome! The foundation of this pose is your hands. I know you don’t want to be, but it is. Specifically the bridge of your hands where your fingers and palm meet. This is where the pressure should be greatest. Yes, It’s going to suck and it may hurt your wrist. (FYI if your wrists are weak you’ll really have to work up to this.) It took me months of daily practice and wrist pain until I finally got past it. I also was massaging my arms and wrists. In the perfect down dog those wrists shouldn’t have one bit of pressure on them. If you stick with it I promise one day you’ll see! You should also notice that your nails turn white from pressing them into the ground. Imagine you have little suction cups on your finger tips holding them down. Also be aware that the index fingers are parallel with one another, then spread all the other fingers an equal distance apart just like a fan. Now move to the next area of awareness. The shoulders or scapulas, your focal point. As you press your fingers and the bridge of you hand into the ground squish your shoulders up into your ears and then roll them back. Hold those shoulders back! This will create space between your arms and your ears.  You can then begin to feel the opening of your heart space as you press the head closer to the floor. Believe it or not this pose is a backbend. It’s also the first step to a hand stand. Ohh yeah I almost forgot what about those legs? Personally one of the things I love best about this pose is stretching my calf muscles (gastrocnemius and soleus). I just peddle my feet pressing one heal toward the floor then the other. I do this every time I do my dog. Try it, if you haven’t.  There are plenty of other alignment points to talk about but I’ll leave you with these to try.

PHOTOs By amyelizabethbruce

Bound Hands Forward Fold – Baddha Hasta Uttanasana

boundHandsFThis is a great pose to do everyday. Even if you can’t fold forward just hold your hands together and feel the stretch in your chest (pectoralis muscles), biceps and maybe even your forearms or wrist depending on how tight you are. Hold the pose for as long as you can tolerate and do it multiple times a day! Don’t forget to also change finger position for your grip. This will enhance your overall posture and help remind your body that slouching is LAME!!

PHOTO By amyelizabethbruce

Mountain Pose variation – Tadasana

TadasanaFThe true key to this pose is the foundation, your feet! The simplest way to explain… Stand on your feet. There are 4 key points in your feet for stability. Two in the ball and two in the heal. Those points should actively be pressed into the ground as you create muscular strength in your legs to lift your arch up. Who hasn’t heard rooting down to rise up? This should actively lift your arch! Once you get that stability interlace your fingers over your head, palms facing the sky and as you stretch from one side to the other actively press those 4 foot points into the ground. The opposite leg may need a little more push as you move your arms. Remember don’t over do this stretch. Only move comfortably. Don’t dump out your side body. Be gentile with your spine. Standing in this pose move slowly from one side to the other with your breath. Stand strong like a mountain! 🙂 Photo By AmyElizabeth

Wrist Forearm Stretch

wristFYou know you should stretch your forearms and hands. If you saw how much I do these stretches and massaged my own hands and arms you’d probably wonder why they haven’t fallen off. Lol. I’m obsessed with stretching and massage! Besides exercise it really helps create awareness and control over your body. You’re shaping it! You’re making the decision to put yourself though a possible uncomfortable stretching experience to gain flexibility and actually help to eliminate pain in the future. These stretches can truly be done at anytime, anywhere! Even waiting at a red light in your car you could be doing these simple wrist stretches. When you do these you’re stretching the flexor and extender muscles for your forearms, hands and your thumb.

PHOTO by amyelizabethbruce